
|
|
|
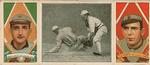
NNO |
|
Good Play at Third (George Moriarty / Ty Cobb) |
|
VAR: Red Text on the back, printed at Factory No. 30 |

|

|
|
NNO |
|
Good Play at Third (George Moriarty / Ty Cobb) |
|
VAR: Black Text on the Back, printed at Factory No. 649 |
|
|
|
|
NNO |
|
Good Play at Third (George Moriarty / Ty Cobb) |
|
VAR: Black Text on the Back, printed at Factory No. 30 |

|

|
|
NNO |
|
Grant Gets His Man (Eddie Grant / Doc Hoblitzell) |
|
VAR: Red Text on the back, printed at Factory No. 30 |
|
|
|
|
NNO |
|
Grant Gets His Man (Eddie Grant / Doc Hoblitzell) |
|
VAR: Black Text on the Back, printed at Factory No. 649 |
|
|
|
|
NNO |
|
Grant Gets His Man (Eddie Grant / Doc Hoblitzell) |
|
VAR: Black Text on the Back, printed at Factory No. 30 |
|
|
|
|
NNO |
|
Hal Chase Too Late (Ambrose McConnell / Matty McIntyre) |
|
VAR: Red Text on the back, printed at Factory No. 30 |

|

|
|
NNO |
|
Hal Chase Too Late (Ambrose McConnell / Matty McIntyre) |
|
VAR: Black Text on the Back, printed at Factory No. 649 |
|
|
|
|
NNO |
|
Hal Chase Too Late (Ambrose McConnell / Matty McIntyre) |
|
VAR: Black Text on the Back, printed at Factory No. 30 |
|
|
|
|
NNO |
|
Hal Chase Too Late (Larry McLean / George Suggs) |
|
VAR: Red Text on the back, printed at Factory No. 30 |

|

|
|
NNO |
|
Hal Chase Too Late (Larry McLean / George Suggs) |
|
VAR: Black Text on the Back, printed at Factory No. 649 |
|
|
|
|
NNO |
|
Hal Chase Too Late (Larry McLean / George Suggs) |
|
VAR: Black Text on the Back, printed at Factory No. 30 |

|

|
|
NNO |
|
Harry Lord at Third: (Ed Lennox / Joe Tinker) |
|
VAR: Red Text on the back, printed at Factory No. 30 |
|
|
|
|
NNO |
|
Harry Lord at Third: (Ed Lennox / Joe Tinker) |
|
VAR: Black Text on the Back, printed at Factory No. 649 |
|
|
|
|
NNO |
|
Harry Lord at Third: (Ed Lennox / Joe Tinker) |
|
VAR: Black Text on the Back, printed at Factory No. 30 |
|
|
|
|
NNO |
|
Hartsel Strikes Out (Dolly Gray / Bob Groom) |
|
VAR: Red Text on the back, printed at Factory No. 30 |

|

|
|
NNO |
|
Hartsel Strikes Out (Dolly Gray / Bob Groom) |
|
VAR: Black Text on the Back, printed at Factory No. 649 |
|
|
|
|
NNO |
|
Hartsel Strikes Out (Dolly Gray / Bob Groom) |
|
VAR: Black Text on the Back, printed at Factory No. 30 |
|
|
|
|
NNO |
|
Hartzell Covering Third (Bill Dahlen / Doc Scanlan) |
|
VAR: Red Text on the back, printed at Factory No. 30 |

|

|
|
NNO |
|
Hartzell Covering Third (Bill Dahlen / Doc Scanlan) |
|
VAR: Black Text on the Back, printed at Factory No. 649 |
|
|
|
|
NNO |
|
Hartzell Covering Third (Bill Dahlen / Doc Scanlan) |
|
VAR: Black Text on the Back, printed at Factory No. 30 |
|
|
|
|
NNO |
|
Held at Third (Harry Lord / Lee Tannehill) |
|
VAR: Red Text on the back, printed at Factory No. 30 |

|

|
|
NNO |
|
Held at Third (Harry Lord / Lee Tannehill) |
|
VAR: Black Text on the Back, printed at Factory No. 649 |
|
|
|
|
NNO |
|
Held at Third (Harry Lord / Lee Tannehill) |
|
VAR: Black Text on the Back, printed at Factory No. 30 |
|
|
|
|
NNO |
|
Jake Stahl Guarding First (Eddie Cicotte / Jake Stahl) |
|
VAR: Red Text on the back, printed at Factory No. 30 |

|

|
|
NNO |
|
Jake Stahl Guarding First (Eddie Cicotte / Jake Stahl) |
|
VAR: Black Text on the Back, printed at Factory No. 649 |
|
|
|
|
NNO |
|
Jake Stahl Guarding First (Eddie Cicotte / Jake Stahl) |
|
VAR: Black Text on the Back, printed at Factory No. 30 |
|
|
|
|
NNO |
|
Jim Delahanty at Bat (Jim Delahanty / Davy Jones) |
|
VAR: Red Text on the back, printed at Factory No. 30 |

|

|
|
NNO |
|
Jim Delahanty at Bat (Jim Delahanty / Davy Jones) |
|
VAR: Black Text on the Back, printed at Factory No. 649 |
|
|
|
|
NNO |
|
Jim Delahanty at Bat (Jim Delahanty / Davy Jones) |
|
VAR: Black Text on the Back, printed at Factory No. 30 |
|
|
|
|
NNO |
|
Just Before the Battle (Red Ames / Chief Meyers) |
|
VAR: Red Text on the back, printed at Factory No. 30 |

|

|
|
NNO |
|
Just Before the Battle (Red Ames / Chief Meyers) |
|
VAR: Black Text on the Back, printed at Factory No. 649 |
|
|
|
|
NNO |
|
Just Before the Battle (Red Ames / Chief Meyers) |
|
VAR: Black Text on the Back, printed at Factory No. 30 |
|
|
|
|
NNO |
|
Just Before the Battle (Beals Becker / Josh Devore) |
|
VAR: Red Text on the back, printed at Factory No. 30 |

|

|
|
NNO |
|
Just Before the Battle (Beals Becker / Josh Devore) |
|
VAR: Black Text on the Back, printed at Factory No. 649 |
|
|
|
|
NNO |
|
Just Before the Battle (Beals Becker / Josh Devore) |
|
VAR: Black Text on the Back, printed at Factory No. 30 |
|
|
|
|
NNO |
|
Just Before the Battle (Roger Bresnahan / John McGraw) |
|
VAR: Red Text on the back, printed at Factory No. 30 |

|

|
|
NNO |
|
Just Before the Battle (Roger Bresnahan / John McGraw) |
|
VAR: Black Text on the Back, printed at Factory No. 649 |
|
|
|
|
NNO |
|
Just Before the Battle (Roger Bresnahan / John McGraw) |
|
VAR: Black Text on the Back, printed at Factory No. 30 |
|
|
|
|
NNO |
|
Just Before the Battle (Doc Crandall / Chief Meyers) |
|
VAR: Red Text on the back, printed at Factory No. 30 |

|

|
|
NNO |
|
Just Before the Battle (Doc Crandall / Chief Meyers) |
|
VAR: Black Text on the Back, printed at Factory No. 649 |
|
|
|
|
NNO |
|
Just Before the Battle (Doc Crandall / Chief Meyers) |
|
VAR: Black Text on the Back, printed at Factory No. 30 |
|
|
|
|
NNO |
|
Just Before the Battle (Art Fletcher / Christy Mathewson) |
|
VAR: Red Text on the back, printed at Factory No. 30 |

|

|
|
NNO |
|
Just Before the Battle (Art Fletcher / Christy Mathewson) |
|
VAR: Black Text on the Back, printed at Factory No. 649 |
|
|
|
|
NNO |
|
Just Before the Battle (Art Fletcher / Christy Mathewson) |
|
VAR: Black Text on the Back, printed at Factory No. 30 |
|
|
|
|
NNO |
|
Just Before the Battle (Rube Marquard / Chief Meyers) |
|
VAR: Red Text on the back, printed at Factory No. 30 |

|

|
|
NNO |
|
Just Before the Battle (Rube Marquard / Chief Meyers) |
|
VAR: Black Text on the Back, printed at Factory No. 649 |
|
|
|
|
NNO |
|
Just Before the Battle (Rube Marquard / Chief Meyers) |
|
VAR: Black Text on the Back, printed at Factory No. 30 |
|
|
|
|
NNO |
|
Just Before the Battle (John McGraw / Hugh Jennings) |
|
VAR: Red Text on the back, printed at Factory No. 30 |

|

|
|
NNO |
|
Just Before the Battle (John McGraw / Hugh Jennings) |
|
VAR: Black Text on the Back, printed at Factory No. 649 |
|
|
|
|
NNO |
|
Just Before the Battle (John McGraw / Hugh Jennings) |
|
VAR: Black Text on the Back, printed at Factory No. 30 |
|
|
|
|
NNO |
|
Just Before the Battle (Chief Meyers / Christy Mathewson) |
|
VAR: Red Text on the back, printed at Factory No. 30 |

|

|
|
NNO |
|
Just Before the Battle (Chief Meyers / Christy Mathewson) |
|
VAR: Black Text on the Back, printed at Factory No. 649 |
|
|
|
|
NNO |
|
Just Before the Battle (Chief Meyers / Christy Mathewson) |
|
VAR: Black Text on the Back, printed at Factory No. 30 |
|
|
|
|
NNO |
|
Just Before the Battle (Chief Meyers / Hook Wiltse) |
|
VAR: Red Text on the back, printed at Factory No. 30 |

|

|
|
NNO |
|
Just Before the Battle (Chief Meyers / Hook Wiltse) |
|
VAR: Black Text on the Back, printed at Factory No. 649 |
|
|
|
|
NNO |
|
Just Before the Battle (Chief Meyers / Hook Wiltse) |
|
VAR: Black Text on the Back, printed at Factory No. 30 |
|
|
|
|
NNO |
|
Just Before the Battle (Red Murray / Fred Snodgrass) |
|
VAR: Red Text on the back, printed at Factory No. 30 |

|

|
|
NNO |
|
Just Before the Battle (Red Murray / Fred Snodgrass) |
|
VAR: Black Text on the Back, printed at Factory No. 649 |
|
|
|
|
NNO |
|
Just Before the Battle (Red Murray / Fred Snodgrass) |
|
VAR: Black Text on the Back, printed at Factory No. 30 |
|
|
|
|
NNO |
|
Knight Catches a Runner (John Knight / Walter Johnson) |
|
VAR: Red Text on the back, printed at Factory No. 30 |

|

|
|
NNO |
|
Knight Catches a Runner (John Knight / Walter Johnson) |
|
VAR: Black Text on the Back, printed at Factory No. 649 |
|
|
|
|
NNO |
|
Knight Catches a Runner (John Knight / Walter Johnson) |
|
VAR: Black Text on the Back, printed at Factory No. 30 |
|
|
|
|
NNO |
|
Lobert Almost Caught (Al Bridwell / Johnny Kling) |
|
VAR: Red Text on the back, printed at Factory No. 30 |

|

|
|
NNO |
|
Lobert Almost Caught (Al Bridwell / Johnny Kling) |
|
VAR: Black Text on the Back, printed at Factory No. 649 |
|
|
|
|
NNO |
|
Lobert Almost Caught (Al Bridwell / Johnny Kling) |
|
VAR: Black Text on the Back, printed at Factory No. 30 |

|

|
|
NNO |
|
Lobert Almost Caught (Johnny Kling / Harry Steinfeldt) |
|
VAR: Red Text on the back, printed at Factory No. 30 |
|
|
|
|
NNO |
|
Lobert Almost Caught (Johnny Kling / Harry Steinfeldt) |
|
VAR: Black Text on the Back, printed at Factory No. 649 |
|
|
|
|
NNO |
|
Lobert Almost Caught (Johnny Kling / Harry Steinfeldt) |
|
VAR: Black Text on the Back, printed at Factory No. 30 |
|
|
|
|
NNO |
|
Lobert Almost Caught (Johnny Kling / Cy Young) |
|
VAR: Red Text on the back, printed at Factory No. 30 |

|

|
|
NNO |
|
Lobert Almost Caught (Johnny Kling / Cy Young) |
|
VAR: Black Text on the Back, printed at Factory No. 649 |
|
|
|
|
NNO |
|
Lobert Almost Caught (Johnny Kling / Cy Young) |
|
VAR: Black Text on the Back, printed at Factory No. 30 |

|

|
|
NNO |
|
Lobert Almost Caught (Al Mattern / Johnny Kling) |
|
VAR: Red Text on the back, printed at Factory No. 30 |
|
|
|
|
NNO |
|
Lobert Almost Caught (Al Mattern / Johnny Kling) |
|
VAR: Black Text on the Back, printed at Factory No. 649 |
|
|
|
|
NNO |
|
Lobert Almost Caught (Al Mattern / Johnny Kling) |
|
VAR: Black Text on the Back, printed at Factory No. 30 |
|
|
|
|
NNO |
|
Lobert Gets Tenney (Red Dooin / Hans Lobert) |
|
VAR: Red Text on the back, printed at Factory No. 30 |

|

|
|
NNO |
|
Lobert Gets Tenney (Red Dooin / Hans Lobert) |
|
VAR: Black Text on the Back, printed at Factory No. 649 |
|
|
|
|
NNO |
|
Lobert Gets Tenney (Red Dooin / Hans Lobert) |
|
VAR: Black Text on the Back, printed at Factory No. 30 |
|
|
|
|
NNO |
|
Lord Catches His Man (Harry Lord / Lee Tannehill) |
|
VAR: Red Text on the back, printed at Factory No. 30 |

|

|
|
NNO |
|
Lord Catches His Man (Harry Lord / Lee Tannehill) |
|
VAR: Black Text on the Back, printed at Factory No. 649 |
|
|
|
|
NNO |
|
Lord Catches His Man (Harry Lord / Lee Tannehill) |
|
VAR: Black Text on the Back, printed at Factory No. 30 |
|
|
|
|
NNO |
|
McConnell Caught (Tom Needham / Lew Richie) |
|
VAR: Red Text on the back, printed at Factory No. 30 |

|

|
|
NNO |
|
McConnell Caught (Tom Needham / Lew Richie) |
|
VAR: Black Text on the Back, printed at Factory No. 649 |
|
|
|
|
NNO |
|
McConnell Caught (Tom Needham / Lew Richie) |
|
VAR: Black Text on the Back, printed at Factory No. 30 |

|

|
|
NNO |
|
McIntyre at Bat (Ambrose McConnell / Matty McIntyre) |
|
VAR: Red Text on the back, printed at Factory No. 30 |
|
|
|
|
NNO |
|
McIntyre at Bat (Ambrose McConnell / Matty McIntyre) |
|
VAR: Black Text on the Back, printed at Factory No. 649 |
|
|
|
|
NNO |
|
McIntyre at Bat (Ambrose McConnell / Matty McIntyre) |
|
VAR: Black Text on the Back, printed at Factory No. 30 |
|
|
|
|
NNO |
|
Moriarty Spiked (Oscar Stanage / Ed Willett) |
|
VAR: Red Text on the back, printed at Factory No. 30 |

|

|
|
NNO |
|
Moriarty Spiked (Oscar Stanage / Ed Willett) |
|
VAR: Black Text on the Back, printed at Factory No. 649 |
|
|
|
|
NNO |
|
Moriarty Spiked (Oscar Stanage / Ed Willett) |
|
VAR: Black Text on the Back, printed at Factory No. 30 |
|
|
|
|
NNO |
|
Nearly Caught (Johnny Bates / Bob Bescher) |
|
VAR: Red Text on the back, printed at Factory No. 30 |

|

|
|
NNO |
|
Nearly Caught (Johnny Bates / Bob Bescher) |
|
VAR: Black Text on the Back, printed at Factory No. 649 |
|
|
|
|
NNO |
|
Nearly Caught (Johnny Bates / Bob Bescher) |
|
VAR: Black Text on the Back, printed at Factory No. 30 |
|
|
|
|
NNO |
|
Oldring Almost Home (Harry Lord / Rube Oldring) |
|
VAR: Red Text on the back, printed at Factory No. 30 |

|

|
|
NNO |
|
Oldring Almost Home (Harry Lord / Rube Oldring) |
|
VAR: Black Text on the Back, printed at Factory No. 649 |
|
|
|
|
NNO |
|
Oldring Almost Home (Harry Lord / Rube Oldring) |
|
VAR: Black Text on the Back, printed at Factory No. 30 |
|
|
|
|
NNO |
|
Schaefer on First (George McBride / Clyde Milan) |
|
VAR: Red Text on the back, printed at Factory No. 30 |

|

|
|
NNO |
|
Schaefer on First (George McBride / Clyde Milan) |
|
VAR: Black Text on the Back, printed at Factory No. 649 |
|
|
|
|
NNO |
|
Schaefer on First (George McBride / Clyde Milan) |
|
VAR: Black Text on the Back, printed at Factory No. 30 |
|
|
|
|
NNO |
|
Schaefer Steals Second (George McBride / Clark Griffith) |
|
VAR: Red Text on the back, printed at Factory No. 30 |


")